Lately, I had been asked to help out with the deployment Adobe Acrobat DC to Microsoft Intune-managed notebooks. Getting out of my system design/software architecture bubble turned out to be an interesting experience.
First of all some background: All notebooks are managed by Microsoft Intune through the Microsoft Endpoint Manager. They have been deployed with help of Windows Autopilot.
Adobe Adcrobat DC
Getting the binaries
Adobe provides the base binaries for Adobe Acrobat DC (not Adobe Acrobat Reader) for free, without requiring a login. After downloading the ~ 1 GByte MUI package, I had also to download the Acrobat DC Customization Wizard.
Head over to the latest releases and download the correct .msp file. These are the patches which will be installed over the base binary. In my case I had to go with Acrobat Planned Update Windows Installer 32 Bit.
Customization of the Acrobat DC installer
With help of the Customization Wizard you can customize the Acrobat DC installer. Basically, you have to
- unzip the MMUI ZIP file
- start the customization wizard
- load the extracted
AcroPro.msifile in the customization wizard - configure the installation procedure with help of the customization wizard
- save the package.
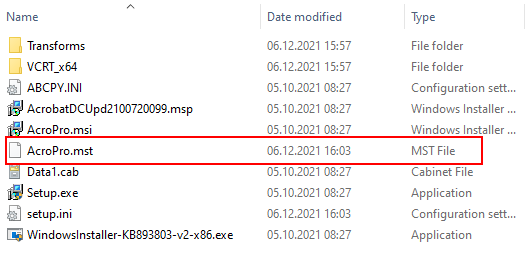
By saving the package, an AcroPro.mst file will be created. The .mst file is later used by the MSI installer to transform the installation process. Don’t get confused by the Pro suffix in the AcroPro.msi file. Acrobat DC Standard and Pro are using the same installer.
Applying patches
Copy the previously downloaded patch file next to the AcroPro.msi file.
Without the latest patch you will likely see the error that your browser or operating system is not up-to-date when starting Adobe Acrobat DC.
Edit the setup.ini file to add the previously copied patch:
[PatchProduct4]
ProductType=Acrobat
PatchVersion=21.007.20099
Path=AcrobatDCUpd2100720099.msp
If you don’t add the .msp to the setup.ini, you will probably receive the error 0x80070663 in Intune/Endpoint Protection during deployment.
Converting the installer to an .intunewin package
To deploy the package to Microsoft Intune, the MSI installer and all dependent packages have to be converted to the .intunewin format. Head over to https://github.com/Microsoft/Microsoft-Win32-Content-Prep-Tool, download the binary and execute it:
.\IntuneWinAppUtil.exe
Please specify the source folder: c:\temp\acrobat
Please specify the setup file: c:\temp\acrobat\AcroPro.msi
Please specify the output folder: c:\temp\acrobat-install
Do you want to specify catalog folder (Y/N)? N
The operation takes some time, but in the end it will look like

Microsoft Intune / Endpoint Manager
In Endpoint Manager, create a new Windows application by navigating to Home > Apps > Windows > Add.
As App Type select Other > Windows app (Win32) app and upload the previously created AcroPro.intunewin file. Please note that this takes some time.
For the installation command, use the following snippet:
msiexec /I "AcroPro.msi" IGNOREVCRT64=1 TRANSFORMS="AcroPro.mst" PATCH="AcrobatDCUpd2100720099.msp" /l*v c:\Adobe_DC_Install.log
With help of the /l*v parameter, the MSI installer creates a log output which helps to debug any issues during the installation.
For the uninstall command, use:
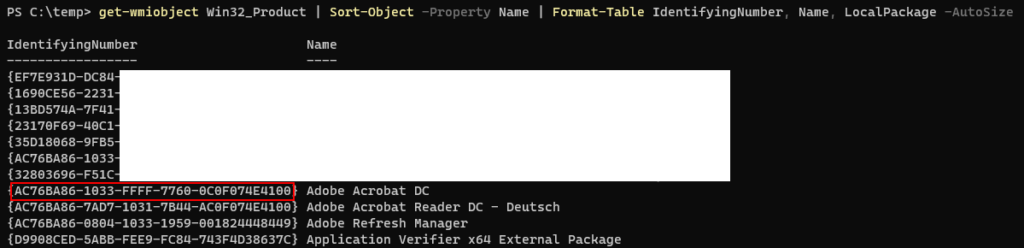
msiexec /x "{AC76BA86-1033-FFFF-7760-0C0F074E4100}" /q
The GUID (AC76BA86-1033-FFFF-7760-0C0F074E4100 in my case) can be looked up on a PC, on which you have already installed Acrobat DC. Just execute the following PowerShell command:
get-wmiobject Win32_Product | Sort-Object -Property Name | Format-Table IdentifyingNumber, Name, LocalPackage -AutoSize
As a detection rule, I am going with a simple if directory exists then strategy. I am using the directory C:\Program Files (x86)\Adobe\Acrobat DC\ as marker to identify an existing Acrobat DC installation.
Please note, that the target machine needs atleast 4.5 GByte of free hard disk space:
- ~1.5 GByte for downloading the
.intunwinpackage - ~1.5 GByte for the installation process
- ~1.5 GByte for the installed files.
Testing
For testing the installation procedures, two security groups had been set up in the Azure Active Directory:
- One security group contained a virtual machine for testing the device installation
- The other security group contained some test users for installing the app through the company portal.
Issues
Error 1603
After assigning the newly created application to the proper security groups, Microsoft Endpoint Manager reported the error code 0x80070643 during installation. After looking through the C:\ProgramData\Microsoft\IntuneManagementExtension\Logs\IntuneManagementExtension.log I noticed that the MSI installer had failed with a very generic error code 1603. To dig deeper, I enabled the /l*v parameter above, waited for a new installation run and looked into the c:\Adobe_DC_Install.log file.
In my case, I tried to deploy the MSI package to a testing VM which had just 2 GByte left. The MSI installer failed with a classic Not enough space exception.
Note 1708 / “Unable to create a temp copy of patch…”
The installation of Adobe DC might fail with the following line in the Adobe_DC_Install.log:
MSI (s) (4C:DC) [12:00:00:00]: Unable to create a temp copy of patch 'AcrobatDCUpd2100720099.msp'.The reason for this might be, that the generated .intunewin file does not contain the .msp file itself. This might happen if you adjust the setup.ini after already having run the Customization Wizard.
You can check the content of the .intunewin with the IntuneWinAppUtilDecoder. Download the .zip file from GitHub. Then extract the file with
IntuneWinAppUtilDecoder.exe .\your_adobe_installer.intunewin